 HarleyMotorcycleParts
Iron 883 (XL883N) Fuel Line Replacement for First-Timers
A small fuel system is still a high-pressure one. Here is the job, explained for newer riders.
New Iron owners often reason that with such a small tank and simple-looking bike, the fuel system must be low stakes. It is small, certainly. It is not low stakes. An electric pump inside that tank pushes fuel at high pressure, the same principle as on a far larger Harley, and the line holds that pressure with the key out. If this is your first time opening a fuel system, read everything below before buying anything.
Tools
- Service manual for your year (not optional)
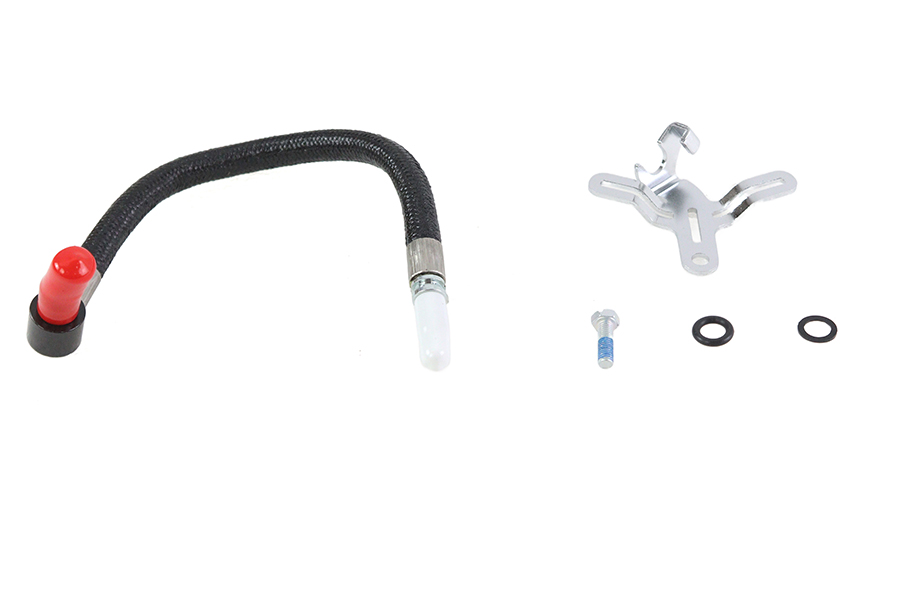
- XL 2007-2021 EFI line
- New O-rings
- Release tool for the fitting if required
- Metal safety can with a lid
- Fire extinguisher, fuel rated, bought before you begin
- Cheap nitrile gloves and safety glasses
A few words explained
EFI means electronic fuel injection. Fuel is pumped, not dropped by gravity, so it is under pressure. Purging means emptying that pressure in a controlled way. A quick-connect is a push-together fitting with a sliding sleeve that locks it in place. An O-ring is the small rubber seal inside that fitting. Prime is the short burst the pump runs when you turn the key on.
If you came across older Sportster advice involving a petcock and a hose clamp, it was written for carb bikes through 2006. Yours is not one of those.
The part is easy to choose
One bit of good news: our catalogue has a single EFI line for XL models 2007-2021, so unlike many Big Twins you do not have to work through several year splits. Still confirm your year on the listing.
Protecting yourself comes first
Wear glasses and gloves, since fuel in the eye is a hospital visit. Work on a stone-cold engine, as a warm pipe can light vapour. Do it outdoors, or with big doors open, since a basement or closed shed is no place for this. Nobody smokes. Keep away from gas appliances and anything else with a flame or a spark.
Stand a fuel-rated extinguisher nearby, and read its instructions now, not later. Have a lidded metal safety can for fuel, and never decant into a drinks bottle.
A dry run with your eyes
Before the first tool comes out, read the manual's section and this page side by side, and lay all the parts on a clean surface. Find the fitting with your eyes and your torch. Work out where your rag goes and where you will stand. Pick a dry, calm day and plenty of daylight, because a first go always takes longer than planned.
Tell somebody nearby what you are doing, too. Having a second person around is useful if something goes wrong, and useful again later for watching a joint while you turn the key. Stop for the day if you get tired.
Doing the work, slowly
Open your service manual to its fuel pressure relief procedure and follow it before touching the line. Generally you take out the pump fuse or unplug the pump's connector, start the bike or crank it until it dies, and do not plug the pump back in until the end. Harley's own paperwork calls this purging. The engine may only run seconds, but check that it is cool before continuing.
Now disconnect the battery, negative cable first. You had to wait because cranking needs the battery.
Photograph the whole line from a few angles. Newcomers skip this, then regret it. See whether the manual wants the small tank lifted for access. Sportster tanks are small, and this may be simpler than you fear, but support it properly and mind wires and hoses.
Wrap a rag around the area under the fitting. Slide the sleeve as your manual shows, with a push then a pull. Do not expect brute force to work, and do not use a screwdriver on it. A small amount of fuel will come out. Cap that open port straight away.
Take off the old line. Hold it beside the new one. They should look the same.
Fit new O-rings. Old ones get flattened, are designed for one use, and cause most leaks at these joints. Push each fitting straight in until it locks. Then pull on it. If it comes off, it was never locked.
Route it just as your photos show, away from the hot exhaust side, with no kinks and all clips in place.
If your line is damaged, a warning
Friends may suggest fixing a split with fuel hose and a clamp, since it is cheap. Refuse. A pressure line repaired that way can blow apart while riding, and you sit right above it. Trailer the bike if necessary.
Your first leak check
Plug in the pump and then reconnect the battery. Turn the key on and do not start the engine. You will hear the pump, then silence. Look at each joint with a torch, and touch it with a tissue. Turn off, turn on, and look again, three or four times.
Not one damp spot? Start the bike, check at idle, and again once warm. Smell or see fuel at any stage, shut it off and redo that joint. For lines inside the tank, see our Fuel Filter and Fuel System Service guide. That one is a bigger step.
Mistakes that cost money
- Believing a small tank means low pressure.
- Following carb-era Sportster advice from an old forum.
- Attacking the sleeve with a screwdriver.
- Starting straight after fitting, to see whether it worked.
- Buying the extinguisher later.
When to stop
There is no shame in stopping. Take it to a shop if the purge confuses you, if the fitting will not lock, or if anything leaks twice. A first-timer who stops is doing it right.
Parts for this job
Check fitment for your own model and year before ordering — add your bike and we will flag what fits.
Other Harley how-to guides
This guide covers procedure and judgement. Torque figures, fluid capacities, gaps and tension settings are specific to your model and year and must come from the factory service manual for your motorcycle — we deliberately do not print numbers we cannot stand behind for your bike. Independent aftermarket retailer, not affiliated with Harley-Davidson, Inc.